How to build your own family bed (Complete DIY Guide: With and without a FamBed kit)
Dreaming of better sleep and more space for the whole family? Many families with children know the struggle for space in a standard 180 cm double bed. The solution is a “Family Bed” – a giant bed for co-sleeping.
But how do you extend your existing bed so that it becomes safe, attractive and free of annoying height differences and gaps?
In this guide we go through two methods:
- The “raw” DIY solution: A trip to the hardware store (cheaper, but requires more handiwork and can look messy).
- The professional and complete “DIY kit”: Using an extension kit from FamBed.co.uk (easiest, neatest and most stable).
Before you start: What you need to know
Regardless of which solution you choose, the basic principle is the same: You take your existing bed (typically a double bed or continental bed) and attach an extra single bed (typically one or more box mattresses) to the side.
Result: A larger sleeping surface!

Method 1: Extension with a FamBed Kit (Recommended)
This method is for you if you want to be sure of getting a seamless, furniture-like finish with comfort as if it were a complete bed. The bed frames are securely locked together, everything matches in height and it looks and feels like one whole bed.
What you need:
- Your current bed.
- A new box mattress (e.g. 90×200 cm).
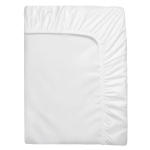
- FamBed “co-sleeping bed” (extension kit) – consisting of a full-width topper and fitted sheets, height-adjustable bed legs with mounting brackets, a bed bridge that fills gaps, and a strap that holds the beds securely together.
Step-by-step guide:
1. Buy the FamBed extension kit and a single bed/box mattress
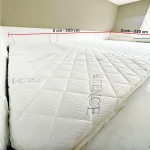
Work out what size you want your bed to be and then order an extra bed that, combined with your existing one, gives you a bed in exactly your dream dimensions. This can be ordered anywhere or be a bed you already have spare – but it can also be purchased together with the FamBed extension kit if you want it easy and convenient. Then order the extension kit from FamBed in the dimensions your existing bed + the bed(s) you are extending with have in total.
2. Fit the FamBed height-adjustable bed legs
When you receive the kit, screw the special FamBed legs onto the new bed. The clever thing here is that the legs can be fine-tuned in height.
- Place the new bed next to the old one.
- Click the legs up or down until the surfaces of the two beds are level.
3. Lock the beds together and level out gaps with the FamBed bed bridge (with included strap)
The biggest problem with co-sleeping in a DIY bed is that the beds slide apart, creating an annoying and potentially dangerous gap in the sleeping surface. But the FamBed extension kit solves this with a bed bridge that goes into the gap between the two beds and a strap that holds the beds securely together.
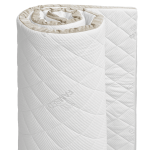
4. Full-size FamBed topper and fitted sheet (Full comfort)
Now you have two beds at the same height, and they are securely joined. Then place the custom-made topper on top with the matching custom-made fitted sheets and voilà – you now have a large, luxurious sleeping surface without seams or gaps.
5. Bed skirt and headboard (The finishing touch)
So now you have a comfortable and safe sleeping surface, but the assembled beds can look somewhat messy – this is where the FamBed bed skirt comes in, to make the assembled beds look like one seamless piece of furniture, presentable and less cluttered.
- ✅ No height difference (critical for comfort).
- ✅ The beds don’t slide apart.
- ✅ Gentle on the bed frame (no drilling into visible sides).
- ✅ Fitted sheets, topper and bed skirt that fit perfectly without seams.
- ✅ Neat and presentable appearance like a “real, complete bed”.
Method 2: The “raw” DIY solution (The budget option)
If you’re handy and want to save a bit of money, you can easily create a larger sleeping surface.
What you need:
- A raising solution (a wooden frame, wooden blocks, books or similar)
- Clamps, long screws or brackets
- Foam from an old mattress or similar
- Fabric and sewing machine (possibly “regular” fitted sheets that can be sewn together)
Step-by-step guide:
1. The height challenge
It is rare for a new box mattress with standard legs to be the same height as your old bed.
- Measure the difference.
- Is the new bed too low? Cut wooden blocks to place under the legs, or use shims.
- Is the new bed too high? Then you’ll need to get the saw out and shorten the legs. Warning: It is difficult to saw 4 legs 100% evenly so the bed doesn’t wobble.

2. Joining the beds
It is important for both safety and comfort that the beds are securely joined, so to hold the beds together you can use several different methods:
- Push the beds together and hold them in place with clamps.
- Use brackets or long screws. Warning: You may need to screw through visible parts of the beds you are joining. Important: Make sure you don’t hit springs or mechanisms inside the bed when screwing.
3. Filling the gap
When you place two different (or identical) beds next to each other, there will typically be a gap that you need to fill.
- Take some foam from a simple foam mattress and cut it to fit the gap, or buy some custom-cut from a local foam supplier. Important: Especially if you don’t have a full-width topper, make sure the gap is filled in a way that prevents children from sliding down into it and getting trapped.
4. The comfort (one complete sleeping surface)
When building your own family bed, the biggest challenge is finding a topper and fitted sheets in the full width to achieve a complete sleeping surface without gaps and seams.
- If you’re handy with a sewing machine, buy 2 toppers and 2 fitted sheets that together have the dimensions of your new bed, cut one side open and sew it together with the other. Alternative 1: Accept the gaps and buy 2 individual toppers and 2 individual fitted sheets.
- Alternative 2: Buy a topper and fitted sheets in the full size from FamBed.
5. The look (one complete bed or a messy look)
If the look of your bedroom is a high priority for you, the DIY route may not be the way to go, because despite being somewhat handy and able to achieve decent comfort, it will often look rather messy when assembling multiple beds.
- Sew your own bed skirt or cover for your assembled beds so it can look like one complete piece of furniture again. Alternative 1: Accept that it all looks a bit messy as long as you sleep well.
Alternative 2: Buy a bed skirt from FamBed in your desired dimensions and make your assembled bed look like one seamless bed.
- ❌ Difficult to hit the exact height (risk of edges/height differences).
- ❌ Requires being “handy” enough to build a raising solution and sew some textiles.
- ❌ Can look a bit “clunky” with assembled beds, raising blocks and no cover / bed skirt.
- ❌ Can slide apart or be unstable unless properly secured.
How to complete the project (Regardless of method)
Once the bed frames are in place, all you need is the finishing touches to go from “two beds” to “one giant bed”.
- Foam wedge: Buy a “love bridge” / foam wedge to place in the gap between the two mattresses.
- Shared topper: If you have the budget, buy a custom-size topper (e.g. 270×200 cm). This removes any sensation of a gap.
- The large fitted sheet: It can be difficult to find fitted sheets in shops for a 270 cm bed. Check specialist retailers or fambed.co.uk for fitted sheets sewn to exactly these widths.
- Bed skirt or cover: To make the whole thing look like a complete piece of furniture, you should consider sewing or buying a bed skirt, or if all the beds are identical, sewing a cover.

Conclusion
If you’re handy and don’t mind a slight height difference, a messier look and aren’t afraid of a bit of DIY, you can get there relatively cheaply with second-hand items and things from local shops. But if you want a “plug and play” solution that feels and looks like one continuous luxury bed, where the height matches perfectly and safety is paramount, then you should perhaps consider an extension kit (or parts of it) from fambed.co.uk.
Enjoy the project – and sleep wonderfully!